Friday, August 23, 2019

Enchantment under the sea

Greetings everyone..


This is Isha Pai and today I am here to share the video tutorial of "Enchantment Under The Sea" - altered canvas.


Here, I have created a deep ocean view with beautiful mermaid and under ocean sea creatures.


Video Tutorial:

Part 1


Part 2

https://www.youtube.com/watch?v=G7NZdSqKSSk&t=27s


I hope you have liked the video tutorial..

Do shower your love in the comments section below..

Happy Crafting!

Love & Peace from me to you all... :)

Monday, August 12, 2019

Beach adventure - The Tropical Sojourn

Greetings everyone!

This is Isha Pai and today I am here to share my this beautiful beach adventure project - The Tropical Sojourn.

Here, I have used two coconut shells with thermocol in it, to give sea effect I have sprayed Sprinkle mist Deep teal blue and Chroma burst fresh water and over it have adhered Clear Mica flakes. 

Also I have used Immix Deco Stones Medium and Mega.

I have made small coconuts (which you can see over the coconut tree) using real coconuts coir.

And the stem of the coconut tree is real tree twig.

Below to paste sea shells and give sand look I have used Immix Natural Desert Texture paste.


I hope you have liked it..

Happy Crafting..

Love & Peace from me to you all

Thursday, August 8, 2019

The Kraken - Monster of the Deep

Greetings!


This is Isha Pai and today I am here on Expressions Craft blog to share the detailed pictorial of "The Kraken - Monster of the Deep".


The Kraken! 

The very whisper of this ocean dwelling behemoth struck terror into the hearts of many a seafarer of old... 

Legend says that the kraken still haunts the seven seas... camouflaging itself and becoming as still as the ocean waters around it, where it lays in wait for its unsuspecting prey.. And at the opportune moment... Entire ships vanish without a trace...

Silent. Invisible. Invincible!


Let's begin with the Pictorial:


Step 1: I have taken an empty beer bottle and have pasted tissue papers over it with the help of Immix Art Medium Matte


Step 2: Then I have made an octopus using air dry clay and have colored it with the newly launched Chroma Burst - Bright Carnival LightFresh WaterCranberry KissSilk Magic MagentaChoco Truffle. Also to mention that I have not sprinkled any water, have just used dry pigment powders.


Step 3: I have taken a foam sheet and have roughly sketched a pirate ship. 


Step 4: And after fussy cutting it, have pasted it on the bottle.


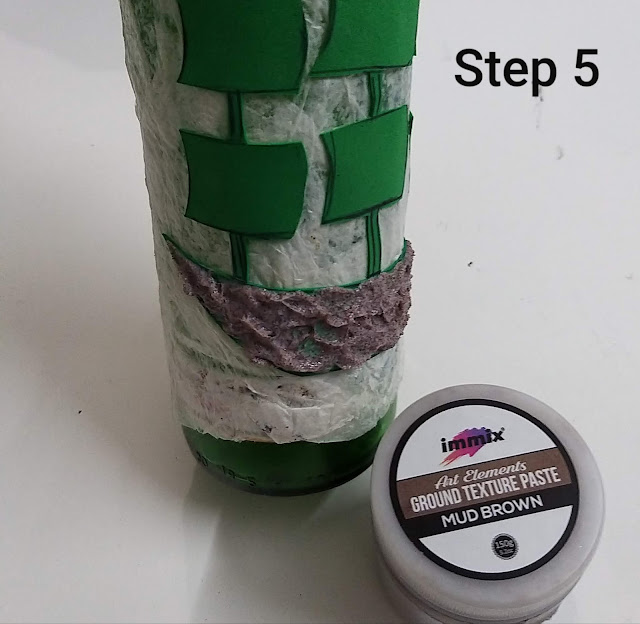
Step 5: Then added Immix Ground Texture Paste (Mud Brown) on the bottom of the ship to give rusty and grainy look as under the sea.


Step 6: Then I have added different sizes of cone shells to give under sea effect and have added Immix Deco stones, Steampunk gear chippie (wheel), skull made of air dry clay and lastly coated everything with Immix heavy black gesso


Step 7: Finally, using dry brush technique, I have colored the whole bottle with Immix chalk paint - Princess Turquoise, newly launched Immix Metallic Paints sapphire blue, jungle green, soft glitter gold and ancient gold. And then pasted the octopus.


Here is the final look of The Kraken


I hope you have liked the pictorial... do shower your love through comments..

Happy Crafting!!

Love & Peace from Me to You All... :) 

Sunday, August 4, 2019

Be Happy, Be Bright, Be you

"Be Happy, Be Bright, Be You" : Guest Inspiration by Isha Pai


Hey Friends, 

This is my Guest Designer post for PRIKA.


I have gone ahead to create this Mixed Media Layout saying : "Be Happy, Be Bright, Be You" for the ongoing blog challenge - "Perfect Smoosh".


Here to add the use of Inks and Sprays, I have used the newly launched product Chroma Bust by Expressions Craft in creating the project.  

List of Supplies Used: 

 # From Expressions craft (Immix):

  • Tag chipboards 
  • Frame chipboards 
  • Chroma bust - fresh water and bright carnival light
  • Sprinkle mist - deep teal blue and royal blue
  • Metallic paints - marsala, hunter green, purple affair and ancient gold 
  • Texture paste
  • Heavy gesso - white and black
  • Chalk paint - orange and lemon yellow 
# From Icraft: Stencil

# From Oasis bazaar: Mdf Sentiment 

Let's begin with the pictorial:

Step.1: For top part - I have randomly arrange the tags and chipboards (not pasted) to get a rough idea about how will it look like.


Step.2: Then did stencilling over tags with the help of Icraft stencil and Immix texture paste. After drying it up with heat tool, I applied one coat of Immix heavy white gesso.


Step.3: Then coloured the cogs wheel frame, square frame and other chipboards with Immix chalk paints. And coloured the MDF Sentiment with ancient gold metallic paint.


Step.4: For bottom part - I have used old audio cassettes.


Step.5: Pasted the cassettes with glue gun in brick form and also paste tree twig over it. Later applied a coat of Immix black gesso and applied ancient gold metallic paint using dry brush technique. 


Finally, pasted all the tags, chipboards and sentiments with hot glue gun (as arranged in step 1) and randomly coloured with Chroma bust, Sprinkle mist and Metallic paints. After colouring everything I pasted the whole top part over the base (bottom part) using hot glue gun and enhanced the look of the project by adding fussy cut butterflies. 


Hope you all enjoyed the tutorial and project created, do leave your lovely comments for me to know your reviews.

Challenge:

1. Splashy Mix August Challenge


Mixed media altered Divine Jewelry box

Greetings Everyone!

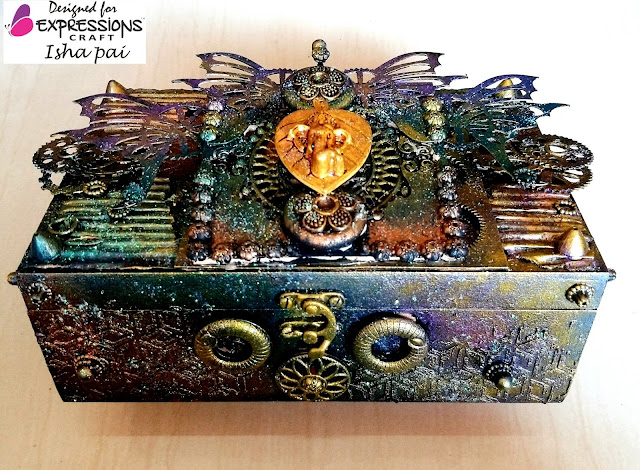
This is Isha Pai and today I am here to share detailed pictorial of Mixed Media Altered Divine Jewelry Box to keep precious ornaments of Lord Ganesha.

Also to mention, I have altered the box using negatives of chipboards, gold rings, beads etc.


Lets begin with the pictorial:

Step 1: I took a MDF box measuring approx 8" x 4.5" and textured it using Diamond Stencil and cement mixed with texture paste


Step 2: After drying of  texture paste, I pasted randomly torn corrugated sheets, the pasted Steampunk Gear set 2 and it's negative in the center. I had many leftover gold/wooden rings and beads which I have pasted randomly as seen in the two pictures below.


Step 3: To make the 3D top layer, I took two negatives chipboards of  a frame and Steampunk butterfly gear added many golden embellishments, wooden rings, wooden flower and ganesha on leaf embellishment.


Step 4: After pasting everything, I applied a coat of Heavy black gesso. Then started the coloring process with metallic paints. I have used a total of 4 metallic paints Bronze moon, Hunter green, Purple Affair. And pasted the frame on the top of the box slightly tilted for a 3D look.


Step 5: Lastly to enhance the look of the box I applied ancient gold metallic paint by using dry brush technique and sealed the colors using a resin spray and also sprinkled Fairy dust. And this is the final look of the box.


I hope the pictorial was easy to understand.

Do try your version of box using Expressions craft product.

All the links are shared (in the names highlighted) to purchase the products I used in making the above box. Simply you can click on the name and go to the page.

Happy Crafting!

Love & Peace from me to you all.... :)